
Introduction
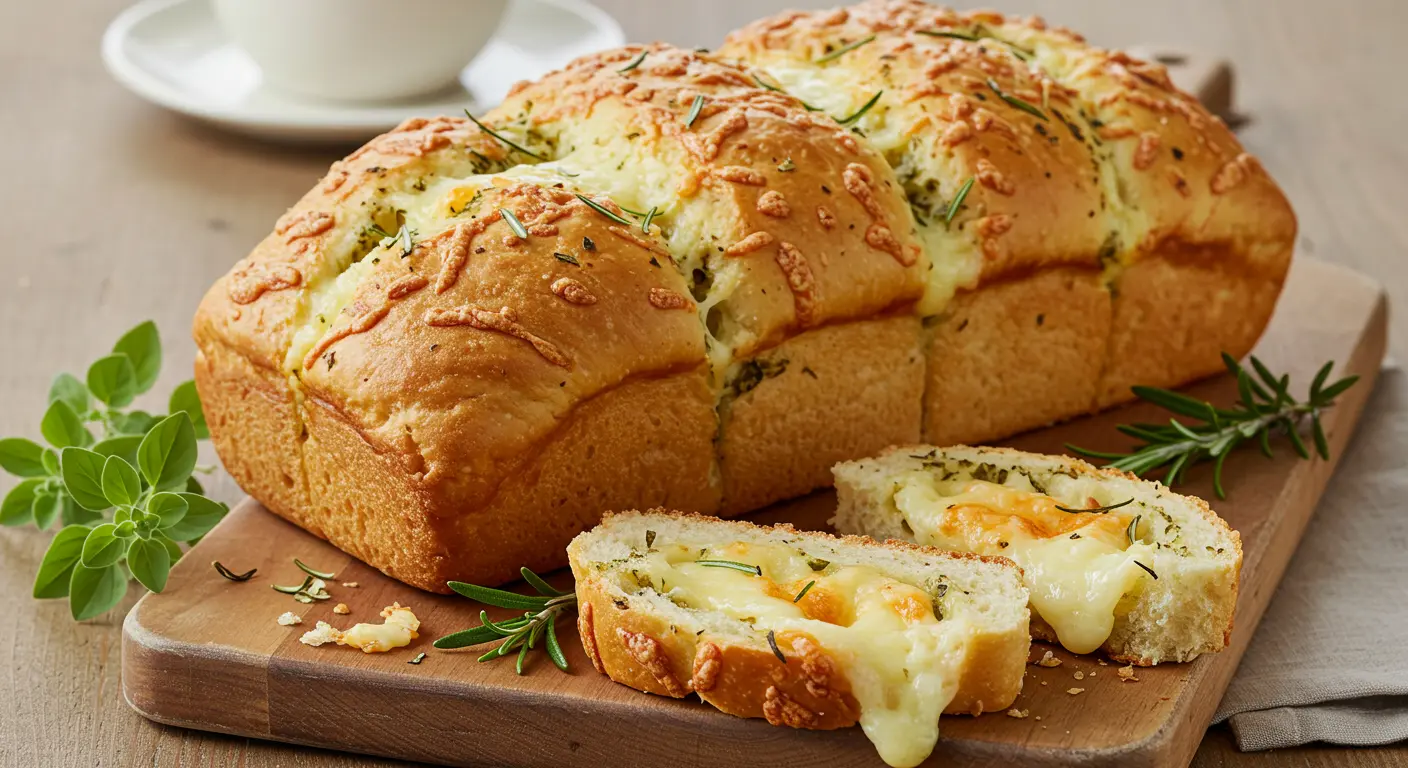
Tired of waiting hours for homemade bread to rise? Many bread lovers think they need an entire afternoon to enjoy fresh-baked goodness. Not anymore! This Italian herbs and cheese bread recipe delivers artisanal flavor and texture in just 30 minutes from start to finish.
As a professional baker who’s spent 15 years perfecting quick bread recipes, I’ve refined this technique to create a loaf that rivals any bakery version. The secret lies in the perfect blend of Italian herbs, high-quality cheese, and a specialized no-rise method.
In this guide, you’ll discover how to select the best ingredients, master the quick-mix technique, and customize your loaf for different occasions. Plus, I’ll share my top tips for achieving that perfect golden crust every single time.
Table of Contents
Why This Bread Recipe Works
- No waiting for dough to rise – ready in just 30 minutes
- Uses basic pantry staples you likely already have on hand
- Versatile recipe works for weeknight dinners or special occasions
- Perfect texture with crispy exterior and soft, flavorful interior
- Foolproof for beginners but impressive enough for experienced bakers
Choosing the Right Ingredients
Best Flour for Quick Italian Herbs and Cheese Bread
All-purpose flour works perfectly for this recipe, creating the ideal texture without needing specialty flour. For a more rustic version, substitute up to 1 cup with whole wheat flour. The protein content in all-purpose flour (10-12%) provides just enough structure without requiring long rising times.
Cheese Selection Tips
The best cheeses for Italian herbs and cheese bread melt well while adding distinct flavor. Look for:
- Fresh mozzarella for traditional stretch and mild flavor
- Parmesan for sharp, salty notes that complement herbs
- Provolone for extra meltiness and subtle tanginess
Pre-shredded cheese works in a pinch, but freshly grated cheese melts better and provides superior flavor.
Herb Options and Substitutions
Traditional Italian herbs create authentic flavor in this bread. The classic blend includes:
- Dried oregano (earthy, robust flavor)
- Basil (sweet, aromatic notes)
- Rosemary (piney, aromatic)
- Thyme (subtle, earthy undertones)
Fresh herbs work beautifully when in season – simply double the amount called for in dried measurements.
Ingredients & Prep
Bread Base Essentials
- 3 cups all-purpose flour
- 1 tablespoon baking powder
- 1 teaspoon baking soda
- 1 teaspoon salt
- 2 tablespoons sugar
- 1½ cups buttermilk (room temperature)
- ¼ cup olive oil
- 1 large egg
Flavor Enhancers
- 1 tablespoon Italian seasoning (or your own herb blend)
- 2 cloves garlic, minced
- ¼ teaspoon red pepper flakes (optional)
- 1½ cups shredded cheese blend (mozzarella, parmesan, provolone)
- 2 tablespoons fresh parsley, chopped (for topping)
Equipment Preparation
For maximum efficiency, gather these tools before starting:
- 9×5 inch loaf pan (greased or lined with parchment)
- Large mixing bowl
- Measuring cups and spoons
- Wooden spoon or silicone spatula
- Pastry brush for egg wash
Step-by-Step Cooking Instructions
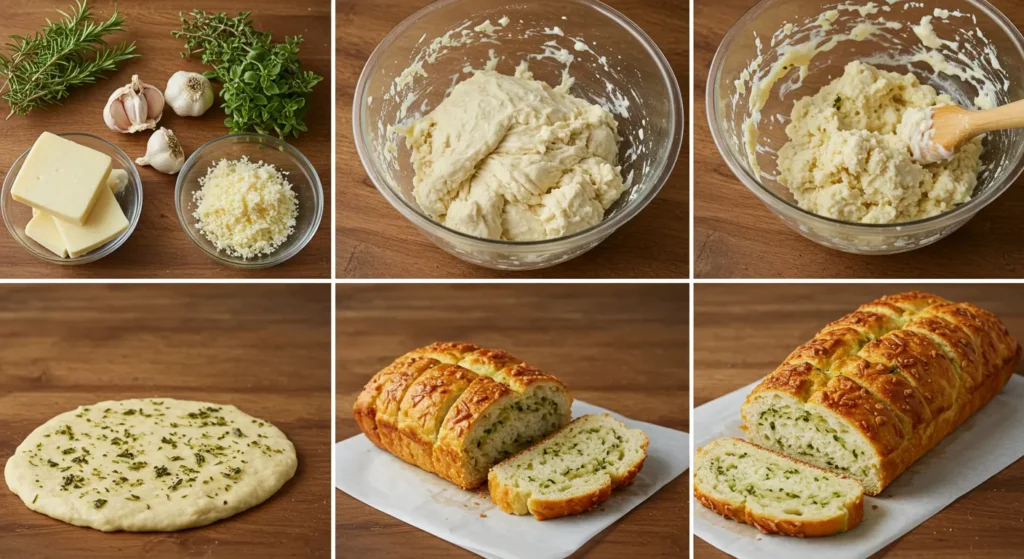
Pre-Baking Prep
- Preheat your oven to 375°F (190°C)
- In a large bowl, whisk together flour, baking powder, baking soda, salt, and sugar
- In a separate bowl, combine buttermilk, olive oil, and egg
- Add the Italian herbs and minced garlic to the wet ingredients
- Reserve ½ cup of cheese for topping
Mixing Method
- Create a well in the center of the dry ingredients
- Pour wet ingredients into the well
- Gently fold together until just combined (don’t overmix!)
- When almost fully mixed, fold in 1 cup of the cheese
- The dough should be sticky but manageable
Baking Process
- Transfer dough to the prepared loaf pan
- Smooth the top with a spatula
- Sprinkle with remaining cheese and additional herbs
- Optional: Brush the top with 1 tablespoon olive oil for extra crispiness
- Bake for 22-25 minutes until golden brown and a toothpick comes out clean
Cooling and Serving
- Let bread cool in the pan for 5 minutes
- Remove from pan and cool on a wire rack for an additional 5 minutes
- For best texture, wait 10 minutes before slicing (if you can resist!)
Pro Tips for Perfect Italian Herbs and Cheese Bread
Avoiding Common Mistakes
- Don’t overmix the dough – this develops gluten and creates tough bread
- Use room temperature ingredients for better incorporation
- Check doneness early – ovens vary and this bread bakes quickly
- Don’t skip the resting time – it helps set the structure and improve sliceability
Tool Recommendations
- Digital kitchen thermometer – bread is done at internal temp of 190-200°F
- Silicone spatula for gentle folding
- Parchment paper for easy removal from pan
- Serrated knife for clean slicing
Storage & Reheating
- Store in airtight container at room temperature for up to 3 days
- Freeze sliced bread for up to 3 months
- Reheat frozen slices directly in toaster
- Refresh day-old bread by warming in 300°F oven for 5 minutes
Flavor Variations
Mediterranean Twist
- Add ½ cup chopped sun-dried tomatoes
- Mix in ¼ cup chopped Kalamata olives
- Substitute feta for half of the cheese blend
Herb Garden Harvest
- Triple the fresh herbs for intense flavor
- Add 2 tablespoons pesto to the wet ingredients
- Top with herb butter immediately after baking
Rustic Garlic Loaf
- Double the garlic (4 cloves)
- Add 1 teaspoon garlic powder to dry ingredients
- Brush with garlic butter after baking
Serving Suggestions

Italian herbs and cheese bread pairs beautifully with many dishes:
- Slice and serve alongside pasta dishes like spaghetti and meatballs
- Cut into cubes for dipping in olive oil and balsamic vinegar
- Toast slices for gourmet sandwiches
- Serve with hearty soups like minestrone or tomato bisque
Beverage pairings enhance the herbal notes in this bread:
- Medium-bodied Italian red wine like Chianti
- Light lager or wheat beer
- Sparkling water with lemon for non-alcoholic option
FAQs
Can I make this Italian herbs and cheese bread without buttermilk?
Absolutely! If you don’t have buttermilk on hand, make a quick substitute by adding 1 tablespoon of white vinegar or lemon juice to 1½ cups of regular milk. Let it sit for 5 minutes before using. This creates the acidity needed to activate the baking soda and achieve the perfect texture in your bread.
How can I store leftover Italian herbs and cheese bread?
To maintain freshness, cool the bread completely before storing. Wrap it tightly in plastic wrap or aluminum foil, then place in an airtight container. It will stay fresh at room temperature for up to 3 days. For longer storage, slice the bread before freezing in a freezer-safe bag for up to 3 months. Thaw at room temperature or toast frozen slices directly.
Can I use fresh herbs instead of dried in this recipe?
Yes! Fresh herbs add wonderful flavor and aroma to Italian herbs and cheese bread. When substituting fresh for dried herbs, use three times the amount (3 tablespoons fresh for 1 tablespoon dried). Finely chop fresh herbs to distribute their flavor evenly throughout the bread. Rosemary, basil, oregano, and thyme make an excellent fresh herb combination.
Why did my bread turn out dense?
Dense texture typically results from overmixing the dough or using cold ingredients. Remember to mix just until ingredients are combined—overmixing develops gluten and creates a tougher bread. Also, ensure your buttermilk and egg are at room temperature before mixing. Another common cause is expired leavening agents—check that your baking powder and baking soda are fresh.
Is it possible to make this bread ahead of time for a dinner party?
Yes! You have two excellent options for make-ahead preparation. Option one: prepare the dough up to the point of baking, cover the loaf pan tightly with plastic wrap, and refrigerate for up to 24 hours before baking (may need 2-3 extra minutes in the oven). Option two: bake the bread completely up to a day ahead, then reheat in a 300°F oven for 10 minutes before serving to restore the crisp crust.
Can I make Italian herbs and cheese bread in a bread machine?
This recipe isn’t designed for a bread machine since it’s a quick bread that doesn’t require kneading or rising. However, you can use your bread machine’s “quick bread” cycle if it has one. Add wet ingredients first, then dry ingredients, with yeast omitted. Some machines have a “bake only” function that works well too. Check your machine’s manual for specific instructions.
How can I make my bread more cheesy?
For an extra cheesy version, increase the cheese to 2 cups total, using 1½ cups in the dough and ½ cup on top. For a cheese-filled center, spread half the dough in the pan, add a layer of shredded cheese, then top with remaining dough. Another option is to brush the hot bread with garlic butter immediately after baking and sprinkle with additional grated parmesan for an extra flavor boost.
Why did my cheese topping burn?
Cheese browning too quickly is common with high-moisture cheeses or high oven temperatures. To prevent burning, cover the bread loosely with aluminum foil during the last 10 minutes of baking. Alternatively, add the cheese topping halfway through the baking process instead of at the beginning. Using a cheese blend with lower moisture content (like aged provolone or parmesan) can also reduce burning.
Can I add other ingredients like olives or sun-dried tomatoes?
Definitely! Italian herbs and cheese bread is incredibly versatile. Add up to 1 cup total of mix-ins like chopped olives, sun-dried tomatoes, roasted red peppers, caramelized onions, or crispy pancetta. Just make sure any wet ingredients (like olives) are well-drained and patted dry before adding to prevent excess moisture in the dough. For best results, fold these additions in gently at the very end of mixing.
What’s the best way to serve this bread for a dinner party?
For an impressive presentation, slice the Italian herbs and cheese bread diagonally and arrange in a bread basket lined with a linen napkin to keep it warm. Serve alongside a small dish of high-quality olive oil sprinkled with sea salt and cracked pepper for dipping. For an antipasto spread, pair with an assortment of Italian meats, marinated vegetables, and additional cheeses for a memorable starter.
Conclusion
Homemade bread often carries the reputation of being time-consuming and technically challenging, but this Italian herbs and cheese bread shatters that misconception beautifully. In just 30 minutes, you can transform simple pantry ingredients into a bakery-worthy loaf that fills your home with irresistible aromas and satisfies even the most discerning bread lovers.
What makes this recipe truly special is its remarkable versatility. From casual weeknight dinners to elegant entertaining, this adaptable bread fits seamlessly into any occasion. The combination of aromatic Italian herbs and melty cheese creates a flavor profile that complements everything from hearty soups and pasta dishes to charcuterie boards and simple olive oil dipping.
Beyond its delicious taste, this bread represents something more meaningful in our busy lives—the ability to create something homemade and heartwarming without sacrificing precious time. It’s a reminder that good food doesn’t always require hours of preparation or professional expertise. Sometimes, the most satisfying culinary experiences come from simple recipes executed well.
The quick-mix method used here also makes this an ideal recipe for introducing children or novice bakers to the joys of breadmaking. Without the complexities of yeast activation or lengthy rising times, success is practically guaranteed. This builds confidence in the kitchen and creates opportunities for culinary creativity as bakers experiment with different herb and cheese combinations.
Another noteworthy aspect of this recipe is its economic advantage. Store-bought artisan bread can be surprisingly expensive, especially when featuring specialty ingredients like herbs and cheese. This homemade version costs a fraction of retail prices while delivering superior freshness and the ability to customize flavors precisely to your preference.
From a nutritional perspective, making bread at home gives you complete control over ingredients. You can adjust the salt content, incorporate whole grains, or select organic components according to your dietary preferences. This level of customization simply isn’t possible with most commercial bread products.
As you master this basic recipe, consider it a foundation for endless exploration. The fundamental techniques learned here—proper mixing, correct oven temperature, and testing for doneness—transfer to countless other quick bread recipes. Your success with this Italian herbs and cheese bread opens doors to a whole world of homemade bread possibilities.
Call to Action
Ready to transform your home into an Italian bakery in just 30 minutes? Grab your mixing bowl and preheat that oven! This Italian herbs and cheese bread recipe is waiting to become your new go-to when time is short but your appetite for homemade goodness is strong.
Share your baking success with us by tagging #30MinuteBreadMaster in your social media posts. We love seeing your creative variations and serving suggestions! For personalized advice or troubleshooting, join our baking community forum where experienced bread enthusiasts are always ready to help.
Sign up for our monthly newsletter to receive more quick bread recipes, seasonal variations, and exclusive tips from professional bakers. As a welcome gift, you’ll receive our free e-book, “10 Quick Breads for Every Season,” featuring this and other time-saving recipes.
Got questions about your bread-making journey? Leave a comment below, and our test kitchen team will respond within 24 hours. Your feedback helps us refine our recipes and create new content tailored to your interests.
Remember, great bread doesn’t require a full day of work—just quality ingredients, proper technique, and this foolproof recipe. Start your Italian herbs and cheese bread now, and you’ll be enjoying warm, fragrant slices in half an hour!
Take the first step toward bread-making confidence today. Gather your ingredients, follow our simple steps, and discover just how easy creating spectacular homemade bread can be. Your kitchen will smell amazing, your family will be impressed, and you’ll wonder why you ever thought bread-making was complicated.
Happy baking!